| About Genesis OPC Explorer 3.1 |
|
|
| IDE: | MS Visual Studio 2017 |
| Appl. Size: | 11.8 MB (12.386.304) |
| Creation Date: | 20-Oct-2018 18:09:18 |
| Installer Size: | 6.70 MB (7.025.823 bytes) |
| Installer Date | 20-Oct-2018 18:43:37 |
Genesis OPC Explorer 3.1 Menu
Genesis OPC Explorer 3.1
Fast Track
What's New in Release 3.0
Feedback and Awards
Download Counters
Download Genesis OPC Explorer 3.1
Safe Use of Genesis OPC Explorer 3.1
Genesis History
Genesis OPC Explorer Setup
Select OPC Server
Manage OPC Groups
Manage Acquired OPC Items
Manage Calculated OPC Items
Load OPC Project
Save OPC Project
Close OPC Project
Data Acquisition and Storage
Start Data Acquisition
Resume Data Acquisition
Stop Data Acquisition
Display Performance Data
Acquisition Data Matrix
OPC Data Listing
Display of OPC Data Listing
Export OPC Data
Export to Clipboard
Toggle Performance Display
Configure Types Color
OPC Data Charting
Display of OPC Data Chart
Set Chart Series Colour
Set Chart Title Options
Manipulate Chart Display
Set Series Selection
Set Chart Axis
Set Chart Legends
Save Chart Image as File
Save Chart Image to Clipboard
Enable Cursor Data
Toggle Server Data Display
Registration and Support
Register Genesis OPC Explorer 3.1
Support of Genesis OPC Explorer 3.1
Register Support of Genesis OPC Explorer 3.1
 |
Thanks for bringing support to TGMDev |
| through PayPal Donations... |
 |
|
|
|
|
Start Genesis OPC Data Acquistion
Once a Genesis OPC Project is either setup (see here for details) or
loaded ( see here for details), the Data Acquisition can be started.
- Click on the icon 'Data Acquisition and Storage' in the left pane of Genesis OPC Explorer 3.1 main window.
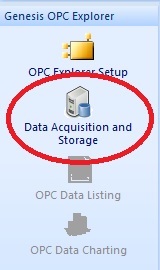
Note that the icons 'OPC Data Listing' and 'OPC Data Charting' are still grayed as no OPC data is available.
- Click on the Button 'Start Data Acquisition' of the Ribbon Category 'Data Acquisition'
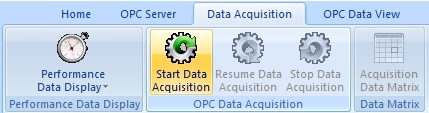
At that point, Genesis OPC Explorer 3.1 can handle Data Acquisition in two different modes:
- Continuous Data Acquisition
In that mode, data acquistion is started directly and will run continuously. Once the session is finished, the data acquisition have to be stopped manually.
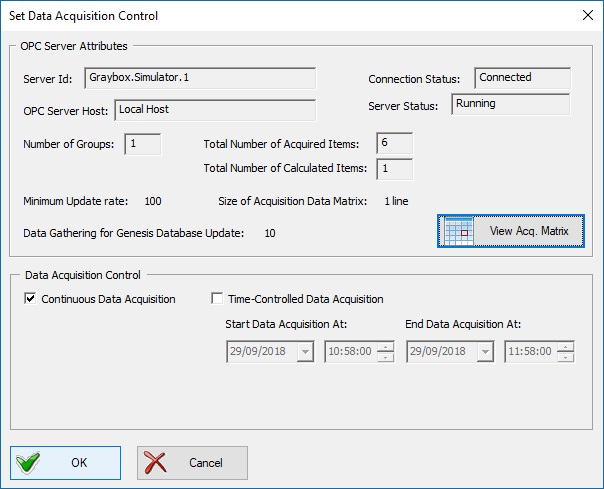 Selection of Continuous Data Acquisition Control
- Time-Controlled Data Acquisition
In that mode, the start time and end time of data acquisiton can be selected before the start of acquisition. Genesis OPC Explorer 3.1
will start data acquisition at requested start time and will automatically stop at the requested end time.
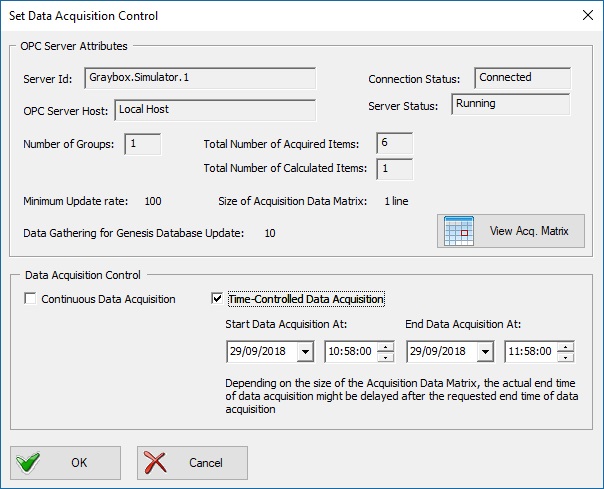 Selection of Time-Controlled Data Acquisition Control
Depending on the size of the Acquisition Data Matrix, the actual end time of data acquisition might be delayed after the requested end time of data acquisition.
More about Data Acquisition Matrix here
The view 'Data Acquisition and Storage' gives a lot of information about the running processes of OPC Data Acquisition:
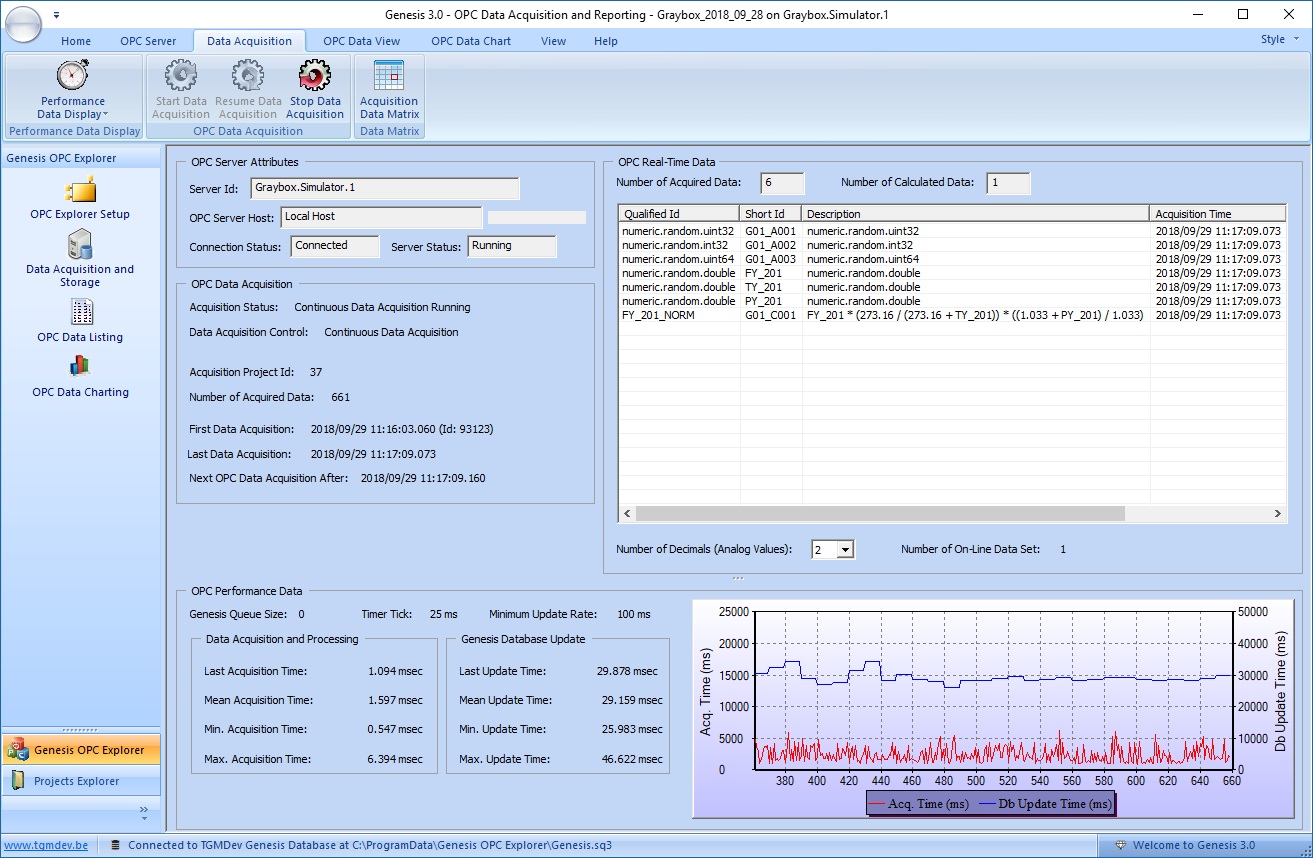 OPC Data Acquisition Running
Click on the different elements (draw in blue) below to view localization of OPC Acquisition Information.
- OPC Server Attributes: Server Id, OPC Server Host, Connection Status and Server Status
- OPC Data Acquisition:
- Acquisition Status: the actual text depend on the acquisition mode
- Project Id: this is the identifier of the current OPC Data acquisition session in the Genesis Database
- Number of Acquired Data
- Data Acquisition Times: First, Last and Next Data Acquisition time
- OPC Real-Time Data: Listing of Last Acquired Data with Id, Short Id, Description, Acquisition Time, OPC Value and OPC Quality
- OPC Performance Data (all times expressed in milliseconds)
- Data Acquisition: Statistics of Data acquisition (last, average, minimum and maximum time for OPC Data acquisition)
- Database Update: Statistics of data storage in Genesis database (last, average, minimum and maximum time for OPC Data storage)
- Performance Chart; Chart of Last Time for Data Acquisition (Red Trends) and Data Storage (Blue Trends)
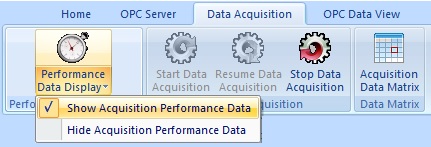
Note that the Performance Data controls can be either displayed or hidden using the menu associated with the button'Performance Data Display'
See Also
Resume Data Acquisition
Stop Data Acquisition
Acquisition Data Matrix
|
|
|
|
Tell your Friends about Genesis OPC Explorer 3.1
Visitors Count: 35117
|